14 oktober 2014

Web page support with the FancyBox, the PhotoSwipe and the Slide Show 4 skin

In version the Slide Show 4 skin, in the FancyBox skin and in the PhotoSwipe skin it is possible to add extra web-pages in the standard jAlbum way as has been described in this blog

This note will explain how these pages are added to a photo album made with the jAlbum program where these skins are used.

To add an extra page, click with the right mouse button in the jAlbum Explore and select item 'New page':

Select one of the 4 possible types of pages:
About.htt, About_album.htt, Contact.htt, Map.htt and Empty_page.htt.

Don't select the 'Empty page' item on the first line of the New page pop-up menu!

After adding a page, add a title to the page, by selecting label type Title in the upper right corner of the jAlbum Explore and enter the title below the icon of the new page. This Title will be showed as link to the new page in a top menu bar, see the Slide Show 4 sample album.


About.htt page


The About.htt page is inspired by the Base skin. To use it, create a new About.htt page with the right mouse button in the jAlbum Explore and click on the Edit text of the new page icon. The about.htt page is opened:


If you like to show an author image or company logo on the about page, click the Select button and browse to the image you like to use.
Enter the image width you like to use in the next textbox. If you leave this field empty, the natural width of the image will be used.

If you like to use a title above the contents of the about text, enter your title in the Header field. You can leave that field empty, because you see also the title you have given in the jAlbum Explorere in the menu bar.

Enter the contents of the page via copy and paste in the next Text field. 

The contents of the page is best edited first in a text editor or even better in a html editor. 

For those who are not familiar with html code, I give here part of the text I used to compose the 'About me' page used in the Slide Show 4 sample album:

<p>Hi, I am André Wolff. </p>
<p>I was 30 years active in the software development for Philips in the Netherlands.</p>
<p>To keep my brains active, I spent after my retirement still some time in software development, but now for my hobbies: 
<a href="http://www.andrewolff.nl/FotoSerie/fotoindex.htm" target="_blank">digital photography</a> </p>

A paragraph of text should be surrounded by <p> and </p> tags and just a carrriage return/linefeed is made by a <br> tag.

A link to another web-page should start with <a href="Address_of_the_page" target="_blank"> followed with the text of the link followed by </a>

That is all the html knowledge required to compose the contents of the About.htt page and the other pages.

To see the about page made in this example, click here. The background, text colour etc. of this and all other template pages is determined by the Slide Show 4 skin style and settings.


About_album.htt page


The About_album.htt page is made in the same way as the About page, you can if you like add a centered image at the top of the page. This image is displayed above the text, with the same border as used for a possible theme image in the album. 

If you set the width to 100%, the image will be stretched so that it fills the whole page width.

Click here to see in the 'About this album' page of the Slide Show 4 sample album.


Contact.htt page


The Contact.htt page is inspired by the Turtle skin. If you click the Edit text of  the Contact.htt icon, the next page is opened:


As with the previous page, you can again select an image to be displayed at the top of the page and you can add an optional Title in the Header field.

The next fields are only displayed if you enter text in these fields.

You can define the prefix for the address, in this example 'My home page'. You can do that to for your web-site, in this example 'My home page'.

Click here to see the contact page of  the Slide Show 4 sample album made in this example.


Map.htt page


This page can be used to present a map where the photos in the album have been made. The locations of the photos should have been recorded as waypoints in a Google Earth kml file.

This note describes how to make such a kml file.

If you click the Edit text of  the Map.htt icon, the next page is opened:


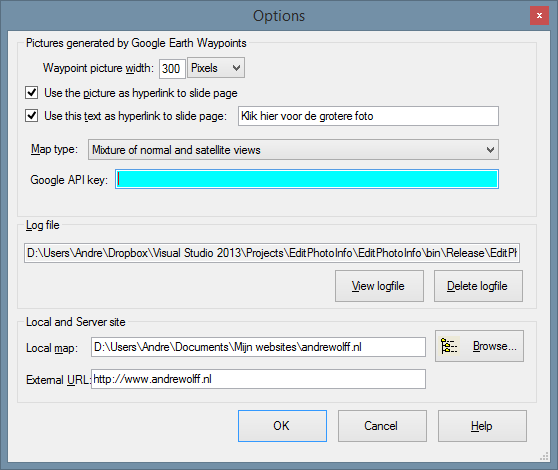
You see the instructions to make a map page on this form. The Map page displays the contents of a Google Earth KML file (the KMZ file is not supported).

For the Slide Show 4 skin, you can make the KML file with my program EditPhotoInfo according to the instructions in the helpfile

The KML file is created in the output directory of the album,  for instance for the sample album:
http://andrewolff.jalbum.net/Vecht_Stegeren/map.kml

If you display the map in the Map.htt web-page, you can delete the optional GoogleMap.html page made in the output directory, however if you uses the Google Maps button defined on the Slide Show 4 links tab, you should enter the text 'GoogleMap.html' in the URL field after 'Open Route in Google Maps:'.

If you have a Google Maps Javascript API key, it is advised to enter that in the first text-box, but you may leave this text-box empty. Next select the type map style and finally enter the URL of the KML file. 

Next create the album and upload it to the server. A local preview will show no map, unless the KML file is already uploaded.


Click here to see this Map page in the Slide Show 4 sample album or click on the link 'Map' in the menu bar to see the map.


Empty_page.htt page


The Empty_page.htt page is made in the same way as the About_album page, without an image. This page is editted by a html editor in the sample album, to see the result, click on the 'More Slide Show 4 info and examples' link in the Slide Show 4 sample album.


Show other links in the menu bar


The menu bar is automatically created if you add one or more web-pages as described above. If the album contains also folders, the extra web-pages are only visible in the menu of the top (parent) album.

However you can use the menu bar also without extra pages to show the links defined on the links tab by setting check-mark 'Show these links in the menu bar':

As an example see my Hameln album

These links are only displayed in the menu of the top (parent) album in case folders are used, unless you set check-mark 'Show these links too in folders'.

If you have already a menu bar due to extra web-pages, these links are added after the links to the extra web-pages.

If the album contains folders, it is also possible to show the folder titles in the menu bar by setting check-mark 'Show links to folders in the menu bar' on the index page tab:

As an example see my Terschelling album

This example shows all links in the menu bar:

The link to the GoogleMap.html page made by program EditPhotoInfo is is also valid for the folder albums if such a GoogleMap.html file is also created for the kml file in the folder directory.

Click here  to download and install the newest version of the Slide Show 4 skin and click here to open the Slide Show 4 skin manual. 


How to add a map to a Slide Show 4, the FancyBox or the PhotoSwipe album


If your photos contain GPS coordinates, the longitude and latitude where the picture was taken, then you can use this to show in a map where the photo was taken. That's possible with  Google Maps or Google Earth. This  note will explain how to add such a map to a photo album  made with the  jAlbum program where the Slide Show 4 skin, the FancyBox skin or the PhotoSwipe skin is used.

First you have to add the GPS coordinates to the EXIF data block in the JPEG file containing your photo.

If your camera has a GPS receiver, the GPS coordinates are added automatically, so that is the easy way. Most mobile phones contain a GPS receiver, so if your photo has been made by the Camera App on an iPhone, your photo contains the GPS coordinates it can be be displayed in a map.

If you have no access to a GPS receiver, you can add the GPS coordinates manually to your photo.

If you process your photos with the Adobe Lightroom program, select the photo where the GPS data should be added and select the Map tab:

Next click with the right mouse button on the location where the photo has been made and select 'Add GPS coordinates to Selected Photos'.

You can also do this with the Picasa 3 program. Open the right Locations sub-window, select the photo where the GPS coordinates should be added and click the green balloon in the Locations sub-window and next click in the map where the photo was taken:

You can do this too in Google Earth by selecting in Picasa menu item Extra > Geotag > Geotag with Google Earth.

Do you use a a separate GPS receiver, like the Garmin GPSMAP 62st which I use,  to record the track in a track log file when you make your photos, you can use that file to fetch the GPS coordinates.

With a GPS receiver, you can see what the coordinates (latitude and longitude) of the place are where the picture is made. Most GPS receivers can, while walking or cycling a route, save the track in a track log file. The GPS stores than from points where you have been, the time, longitude and latitude in the track log file.

If you take a picture, the camera saves the recording time in the EXIF data of the photo. At the same time the track log file saves the longitude and latitude of the camera position with the recording time. This is later used in my program EditPhotoInfo to store the position in the EXIF data block of the photo.

Download and install program EditPhotoInfo from  my download page and start this program:

By clicking the 'Open' button you will get an open file window where you can select a the JPEG file of a photo. You must do it in the directory where the photos are which you did make while recording the GPS.

Next click  the Tracklog button in the 3th panel. You will see an open file window. Select your track log file with the extension .gpx corresponding with the photos in the photo folder. After you have pressed the OK button the locations are automatically added to the photos.

If the location of an image is found you will see it in the right window for example:
'DSC1023.jpg '-> Exif Time: 5/1/2009 15:28:59, Track Log Time: 5/1/2009 15:29:09, Lat: 37.317993, Lon: -7.581656

DSC1023.jpg is the filename of the picture. Exif time the recording time from EXIF data. The Track Log Time is the time of a point from the track log file that was closest to the recording time. The number after 'Lat' is the latitude in decimal degrees (negative for southern hemisphere). The number after 'Lon' is longitude in decimal degrees (negative for points west of Greenwich in London).

If no position is found where you see the following message:
No GPS loc. 2009:01:05 15:33:26 for time out 'DSC1024.jpg' in the track log file.

You will receive notification if the GPS was off when the recording was made or if the clock in the camera synchronized with the time that the GPS system.
In the latter case you can correct it by entering in text box 'Camera time - GPS time (sec) ' the time difference, next you click again the track log button.

You can read the track log file also with the Adobe Lightroom program on the Map tab via command 'Load Tracklog...'. Next select the pictures to be tagged and select command 'Auto -Tag x Selected Photos'. 

After the GPS coordinates have been added to your photos, you can make the Google Earth kml or kmz file. You can make a simple Google Earth kmz file with the Picasa 3 program, but if you use the Slide Show 4 skin, it is better to use my EditPhotoInfo program where the creation of the KML-file has been described in the helpfile.

To make the Google Earth file in Picasa 3, select all photos to be included in the kmz file. Next click menu item Extra > Geotag > Export to Google Earth file and save the file as map.kmz in the output directory of the album. 

Suppose the name of the output directory is
“D:\Users\Andre\Documents\Mijn websites\jalbum.net\Gravenallee_Picasa”
and this will be uploaded to
http://andrewolff.jalbum.net/Gravenallee_Picasa/.
The URL of the Google Earth file map.kmz is in that case
http://andrewolff.jalbum.net/Gravenallee_Picasa/map.kmz

Construct now the Google Maps search string by adding the prefix
https://maps.google.com/maps?q= and the postfix &output=classic
Enter in the URL field of 'Open Route in Google Maps' this search string for Google Maps:
http://maps.google.com/maps?q=http://andrewolff.jalbum.net/Gravenallee_Picasa/map.kmz&output=classic 
and in URL field of 'Open Route in Google Earth' map.kmz
Next click in jAlbum the 'Make album' button and upload the album. 


On this Google page is stated:
From February 2015, maps created in the classic Google Maps —https://maps.google.com/— will no longer load KML/KMZ files from external websites. 

So Google Maps links created above are no longer valid. The new method uses the Map Engine in the following way:

Open Google My Maps and click the 'Create a new map' button.

Click the Import link in the upper left corner and drag the kml file with way-points into the window.
If you like to add a track, click the 'Add Layer' button and drag the kml file with the track into the window.

Next click the green Share button in the upper right corner and enter the Map title and description.
Click he Save button and the 'Change...' link in the next window.
Select option 'Public on the web' in the next window and click the buttons Save and Done.

In the address field of the browser you see now the link to the created map. If you use the PhotoSwipe or Slide Show 4 skin, you can copy that URL to the URL field behind 'Open Route in Google Maps:'.

You can also make a map with my new program MakeMap. The method has been described in the MakeMap helpfile. This program generates a map.kml and an optional GoogleMap.html file in the jAlbum root directory. After the creation of this files, you have only to set the links to these files on the Links tab:


To create a Slide Show 4 Map.htt page, add a Map.htt page in the jAlbum Explorere and Edit that page:


If you have a Google Maps Javascript API key, it is advised to enter that in the first text-box, but you may leave this text-box empty. Next select the type map style and finally enter the URL of the KML file. Next create the album and upload it to the server. A local preview will show no map, unless the KML file is already uploaded.

You see the result hereClick on the Map link in the menu-bar, to see the map in your browser. Click on the Google Earth link to see the map in the Google Earth program. 

If you click in Google Maps on a small thumbnail in the map, the picture is enlarged:

If you make the Google Earth file with my EditPhotoInfo program, you see the next window in Google Maps if you click now on a purple camera icon:

If you click now on the image, the corresponding slide page is opened.

To see that album click here

I made a new program MakeMap to generate the mnap in an even easier way, see the Mapmap helpfile for more information.

To make the Google Earth kml file in program EditPhotoInfo, open that program and click on the Options button in the upper right corner:

The first panel allows you to set the properties of the map and of the picture shown the pop-up window you see if you click on a purple camera icon, see above.

The information in the panel 'Local and Server site' is used to create the Google Earth kml-file. The 'Local map' is the folder on your PC with the start file of your web site. (the root directory). Use the Browse button to select this folder. The 'External URL:' is the Internet address of the corresponding folder on the server.

Close the Options window and click the 'Open' button in the main window and browse to one of the photos in the jAlbum Image directory. Next check in panel that says 'Google Earth kml-file' the check-box to use photos of the website.

Click now on the 'Make file' button and browse to the slides directory of the album and double-click on one of the images. A Google Earth file map.kml is made in the jAlbum output directory. 

To open that file  in Google Earth,  click on the 'Waypoints' button and you see the locations of your photos in Google Earth. 

After the album with the kml-file has been uploaded, you can click on a purple camera icon  to open a pop-up window with the photo. Click here  to see an example. The name of the folder for the waypoints can be entered behind 'Waypoints map name:'. 

If you have a  GPS track log file, you can also display it in Google Earth and save it in the same folder as the waypoints file. The combined result can be saved via 'Save Place as' as map.kml file. Click here to see an example in Google Earth and click here to see the same example in Google Maps and click here to see the map made with the Slide Show 4 Mapp.htt template, which uses the Google Maps Javascript API.

Click here  to download and install newest version of the Slide Show 4 skin and click here to open the Slide Show 4 skin manual.